Summary: A complete guide to installing, configuring, and using the EvBoo Wristband Printer App to print participant wristbands at your event. Covers initial setup – including finding printers, configuring IP addresses, allocating colours to event roles, and assigning colours to printers – as well as day-to-day printing operations.
Target Audience: Event Administrators
Contents
- Overview
- Before You Begin
- Part 1 – Configuration
- Part 2 – Printing Wristbands
- Printer Status Bar
- Test Printing
- Printer Hardware Guides
- Troubleshooting
Overview
The EvBoo Wristband Printer App is a Windows desktop application installed on computers at your event’s check-in or registration area. It connects directly to Zebra ZD510-HC or HC100 wristband printers over your event’s local network and allows your admin team to:
- Search for participants by name, group (Scout Group / Guide Unit), or service / staff team
- Select one or more participants and print their wristbands in one click
- Automatically route each colour to the correct printer
- Check participants in as wristbands are printed
The app supports up to six Zebra printers simultaneously, making it suitable for events of all sizes – from a small camp to a large jamboree. EvBoo will automatically set-up the number of printers supported by your event which will align to the quantity of printers hired from EvBoo. If you’re event has not been correctly enabled please contact EvBoo Support.
Before printing any wristbands, you will need to complete the configuration steps below. Configuration is typically done once before the event opens and only needs to be revisited if printers are replaced or cartridge colours change.
Before You Begin
What you will need
- A computer running Windows, connected to the same local network as your printers
- The EvBoo Wristband Printer App installed on that computer
- One or more Zebra ZD510-HC or Zebra HC100 wristband printers, powered on and connected to the network
- Wristband cartridges in the colours you plan to use, loaded into the printers
- Your event configured in EvBoo with participant roles and (if applicable) visit periods set up
- A small network switch and network cables to connect the printers to the network.
Note: The EvBoo Printer App only supports network connected printers. It does not support them when USB connected.
Supported wristband colours
The app supports the following wristband cartridge colours:
- Blue
- Green
- Orange
- Pink
- Purple
- Red
- Yellow
Part 1 – Configuration
Configuration involves five steps:
- Installing the EvBoo Printer App and logging in for the first time
- Allocating a wristband colour to each event role (e.g. Scout, Adult Leader)
- Finding your printers on the network and entering their IP addresses in the app
- Telling the app which colour cartridge is loaded in each physical printer
- Optionally uploading your event logo to print on the wristbands
Step 1 – Installing the EvBoo Wristband Printer App
The EvBoo Printer App is designed for Windows laptops used at events. The device must have a reliable internet connection to access participant data. On the Windows laptop:
Open a web browser or Press Windows key + R (Run)
Enter the URL provided by EvBoo
Then press Enter.
On the page that opens, click Install. Follow the on‑screen instructions. Any required pre‑requisites will be installed automatically
Once complete, the Printer App will be available on the device. After installation, it’s recommended to:
Pin the app to the Start Menu, or the Taskbar or create a Desktop shortcut. This makes it quick to launch during busy event check‑in periods.
When you run the Printer App, you will be asked to provide your event’s unique identifier. This can be found as follows:
- Log in to EvBoo in a web browser
- Open your event
- Go to the My Details page for the event
- The Event Unique Identifier is shown there
Copy and paste this value into the Printer App to get started.
Step 2 – Allocate Wristband Colours to Event Roles
Before the app can print the correct colour for each participant, you need to tell EvBoo which colour wristband each event role (e.g. Scout / Guide, Young Leader, Adult Leader) should receive. If your event uses visit periods (e.g. Whole Event, Day Visitor), you can set a different colour for each combination of role and visit period. If your event has multiple sections (i.e. Beavers and Cubs and Scouts, or Brownies and Guides) it is possible to split the Participants Event Role into a specific section printed on the wristbands. If you would like that, contact EvBoo support and request they enable Multiple Participant Section Support.
Colour allocation can be performed through the main EvBoo App (your booking system), as well as on the Printer App itself.
To allocate colours:
- Log in to your EvBoo Event Booking System as an Event Administrator
- Navigate to the Configuration Menu and then Wristband Colour Allocation
- The grid shows every combination of event role and visit period
- Right-click on a row to assign a colour – a menu appears with all available colours
- The row background changes to the assigned colour so you can see at a glance what has been set
- Repeat for every row that needs a colour
The screen also shows summary counts at the top, including how many participants are allocated to each colour and how many boxes of wristbands you will need.
Tip: You will need to complete colour allocation about 6 weeks before the event opens so the wristbands can be ordered for your event and to ensure participant wristband data is ready when you start printing.
Note: If a participant’s role has no colour assigned, the Printer App will alert you when you try to print their wristband. Always ensure all roles are allocated a colour before the event begins.
Step 3 – Find and Set Up Your Printers
Ensure the printers are powered on and connected to the network. Insert a wristband cartridge into each printer. Ensure a unique colour is in each printer. The printer should obtain an IP address using the DHCP server. You can then attempt to identify the printers as follows:
To open Printer Setup:
- In the Printer App, open the Settings menu
- Click Printer IP Address Setup
- The Printer Setup dialog opens, showing up to six printer slots (the exact number will have been configured for your event).
Using the Subnet Scan to find printers automatically:
Rather than manually typing IP addresses, you can use the built-in scanner to find Zebra printers on your network:
- Click Scan Network in the Printer Setup dialog
- The app scans your local subnet (this may take 30-60 seconds)
- Any Zebra ZD510 or HC100 printers found are listed in the Scan Results window
- For each printer found, click Assign to Printer 1 (or 2, 3, etc.) to add it to that slot
- Click OK to save
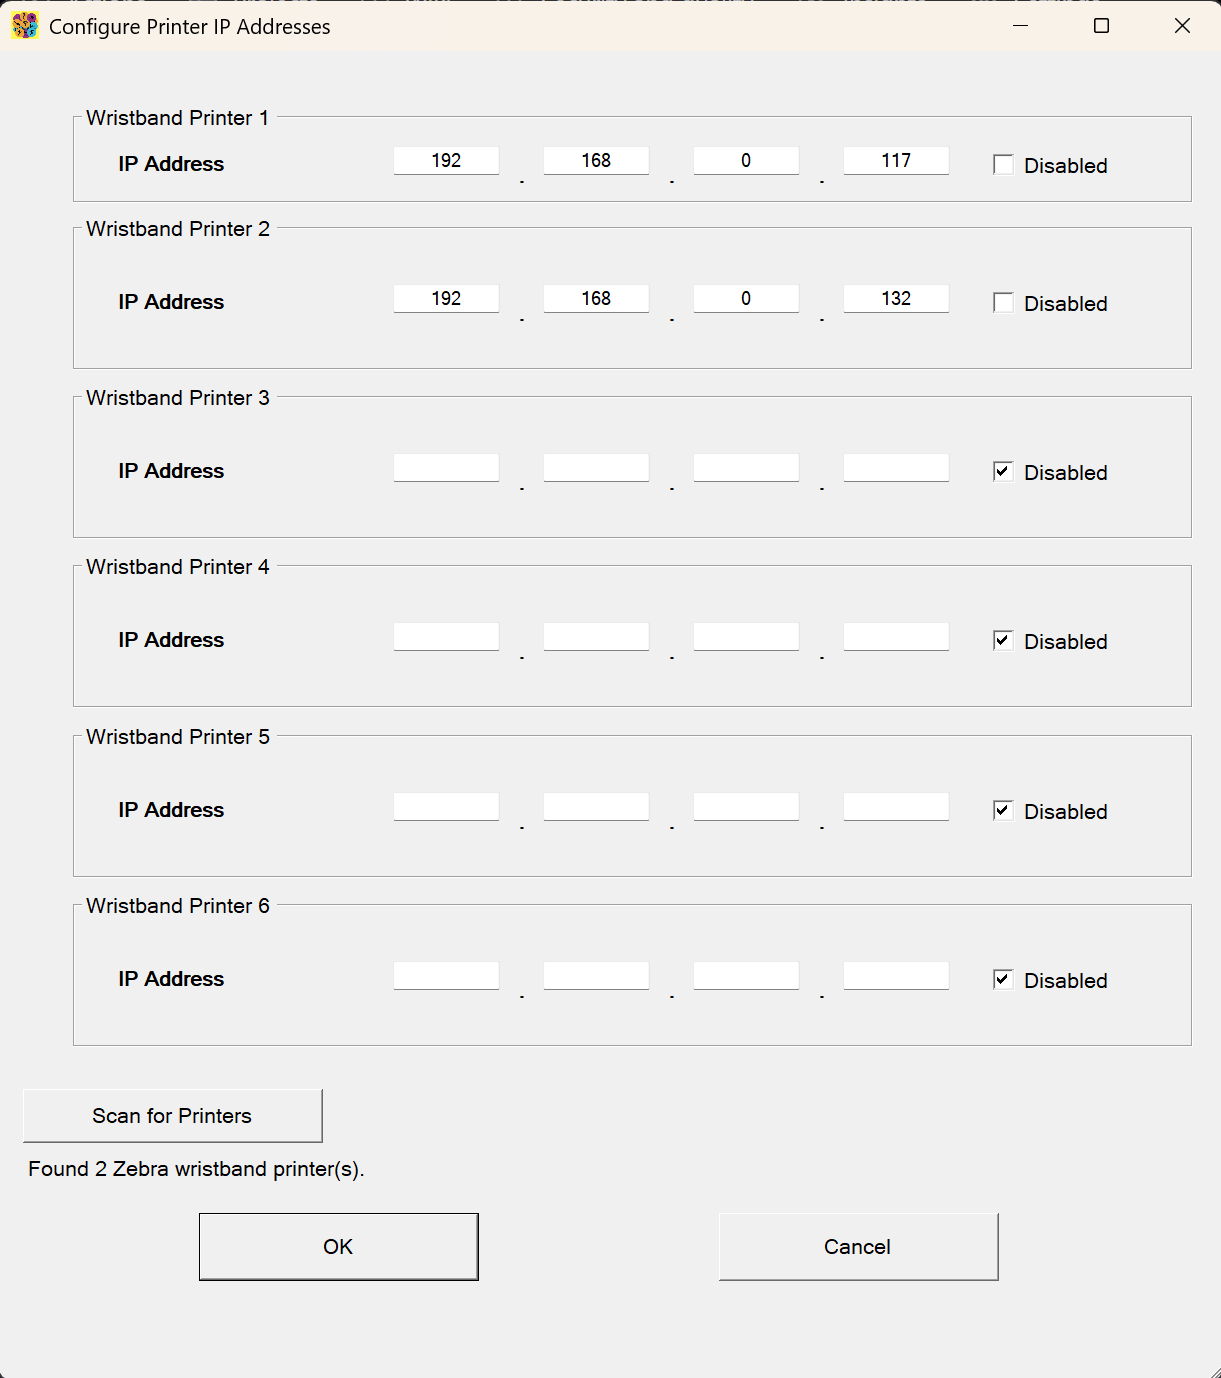
Entering IP addresses manually:
If you know the IP address of each printer, you can type it directly:
- In the Printer Setup dialog, locate the row for Printer 1, 2, 3, etc.
- Enter the IP address split across the four boxes (one number per box, e.g. 192, 168, 1, 50)
- Press Tab to move between boxes – the cursor moves automatically when you type three digits
- If a printer is not in use, tick the Disabled checkbox for that slot – this hides it from the app and prevents the app from trying to connect
- Click OK to save
Tip: Assign static (fixed) IP addresses to your printers in your network router or switch settings before the event. This prevents IP addresses from changing between sessions and saves reconfiguration time.
Step 4 – Assign Colours to Printers
Once you have set the IP addresses, you need to tell the app which colour cartridge is physically loaded in each printer.
To open Printer Colour Setup:
- In the Settings menu, click Printer Colour Setup
- The Printer Colour Setup dialog shows a section for each colour (Purple, Blue, Green, Orange, Pink, Red, and Yellow)
- For each colour, select the radio button corresponding to the printer that has that colour cartridge loaded. Select None if no printer is set up for that colour.
- Click OK to save
Using Auto-Allocate from Loaded Cartridges:
The app can query each printer to find out which cartridge is currently loaded and suggest an allocation automatically:
- When you open Printer Colour Setup, the app queries each printer. Radio buttons for colours that match a loaded cartridge are highlighted in bold
- Click Allocate from Loaded Cartridges to have the app automatically assign each printer to the colour of its loaded cartridge
- Review the allocations and click OK to save
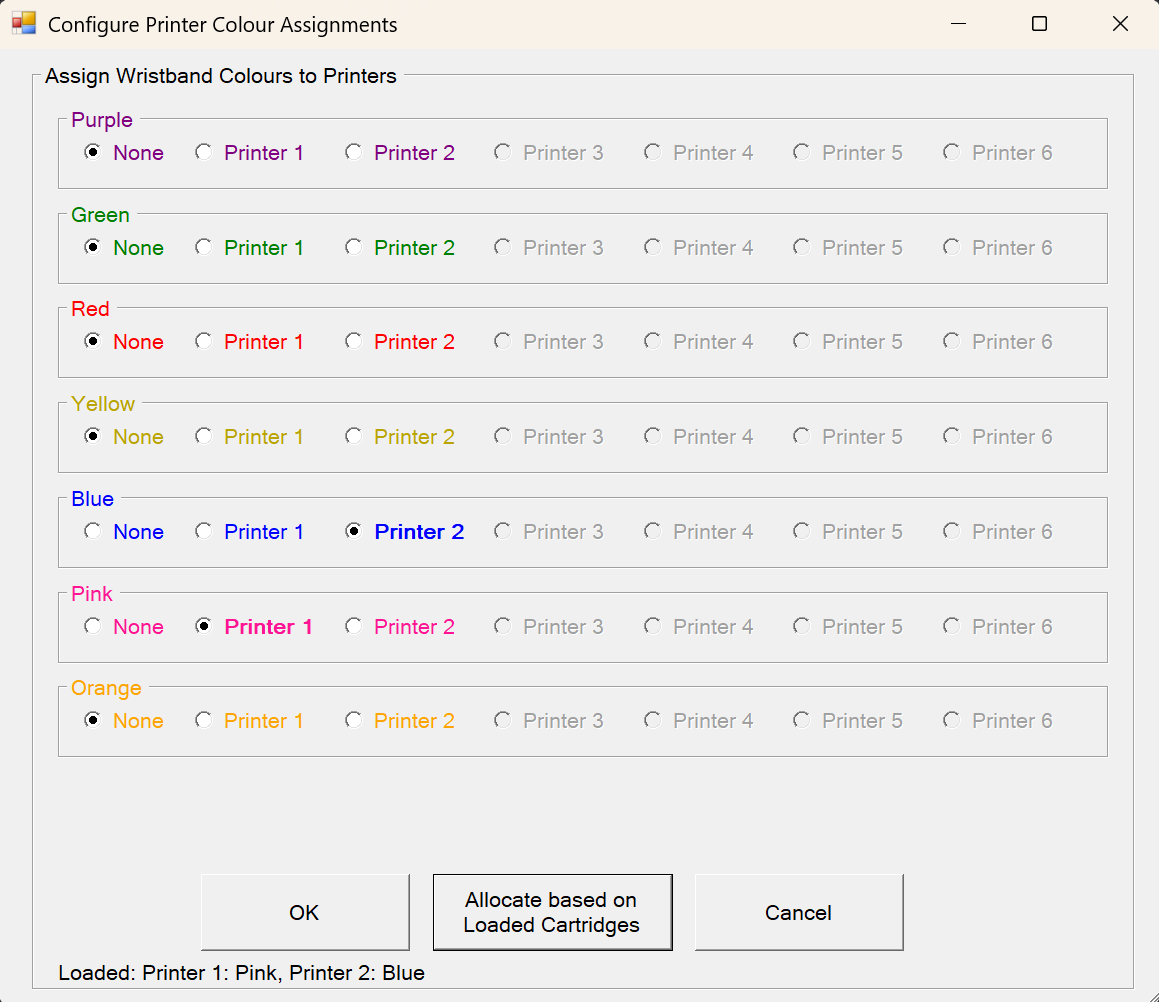
Important: If you change a cartridge mid-event (e.g. swapping from Blue to Red), return to Printer Colour Setup and update the allocation for that printer.
Step 5 – Upload Your Event Logo (Optional)
You can upload your event’s logo to the Zebra printers so that it appears on every wristband printed. The logo is stored in the printer’s permanent memory and survives printer restarts. The following describes how to prepare and upload your logo.
Preparing Images for EvBoo Zebra Wristband Printing
To get the best results when printing logos on Zebra barcoded wristbands using the EvBoo Wristband Printer App, it’s important to prepare your images correctly.
Understanding Wristband Orientation
Zebra wristbands are approximately:
- 12 inches long
- 1 inch high
If you lay a wristband out flat in front of you, with the longest edge running left to right, this is the normal viewing orientation.
When designing or viewing your logo on a screen:
- The logo should appear correctly orientated in this horizontal layout
- This is the normal orientation you should supply to EvBoo
Important
Although the wristband is viewed horizontally, Zebra printers print along the length of the band, not across it. Because of this, the image must be rotated before printing. The EvBoo App will automatically rotate the image on upload by default. Under normal circumstances you don’t need to worry about rotating it.
Recommended Image Size
Height (Most Important)
For EvBoo wristbands, we recommend:
- Ideal height: 251 pixels
- Maximum: 260 pixels
- Minimum: 220 pixels
The EvBoo Printer App will automatically resize an image outside of this specification.
Width
- The width can not exceed 900 pixels
- Wider images will take up more space along the wristband
For best results, resize your image yourself before uploading, rather than relying on automatic scaling.
Image Colour and Style Requirements
Zebra wristband printers are thermal printers, which means image quality depends heavily on contrast and simplicity.
Colour Rules
- Images must be monochrome
- Black and white only
- Greyscale is not supported
- Avoid gradients, shadows, or fine detail
Design Tips
- Use bold, simple shapes
- Single‑colour designs work best
- Thin lines may not print clearly
In some cases, you may need to:
- Make parts of your logo thicker
- Adjust line weights before or after resizing
Inverting the Image
Depending on your design, you may get better results if you:
- Invert the image (for example, a white logo on a black background)
We recommend testing both versions if results are unclear.
Best Practice Checklist
Before uploading your image to the EvBoo Wristband Printer App, ensure:
- ✅ Image is correctly orientated for normal horizontal viewing
- ✅ Image height is between 220–260 px (ideally 251 px)
- ✅ Image is monochrome (not greyscale)
- ✅ Design is bold and simple
- ✅ Image has been resized and reviewed before upload
Uploading the logo
To upload a logo:
- In the Settings menu, click Upload Logo
- Click Browse to select an image file (PNG, JPEG, BMP, or GIF are supported)
- The app shows a side-by-side preview:
- Left panel: The original image as loaded
- Right panel: The processed image (greyscale, monochrome, resized) as it will appear on the wristband
- Use the Rotate button (⤸) next to the original image if the image needs rotating before processing
- Tick Rotate 90° Clockwise if the image needs to be rotated when sent to the printer (this is checked by default for the reasons explained above)
- Tick the checkboxes for each printer you want to upload the logo to
- Click Upload to Printers
- Click OK to confirm – the logo filename is saved to the event configuration automatically
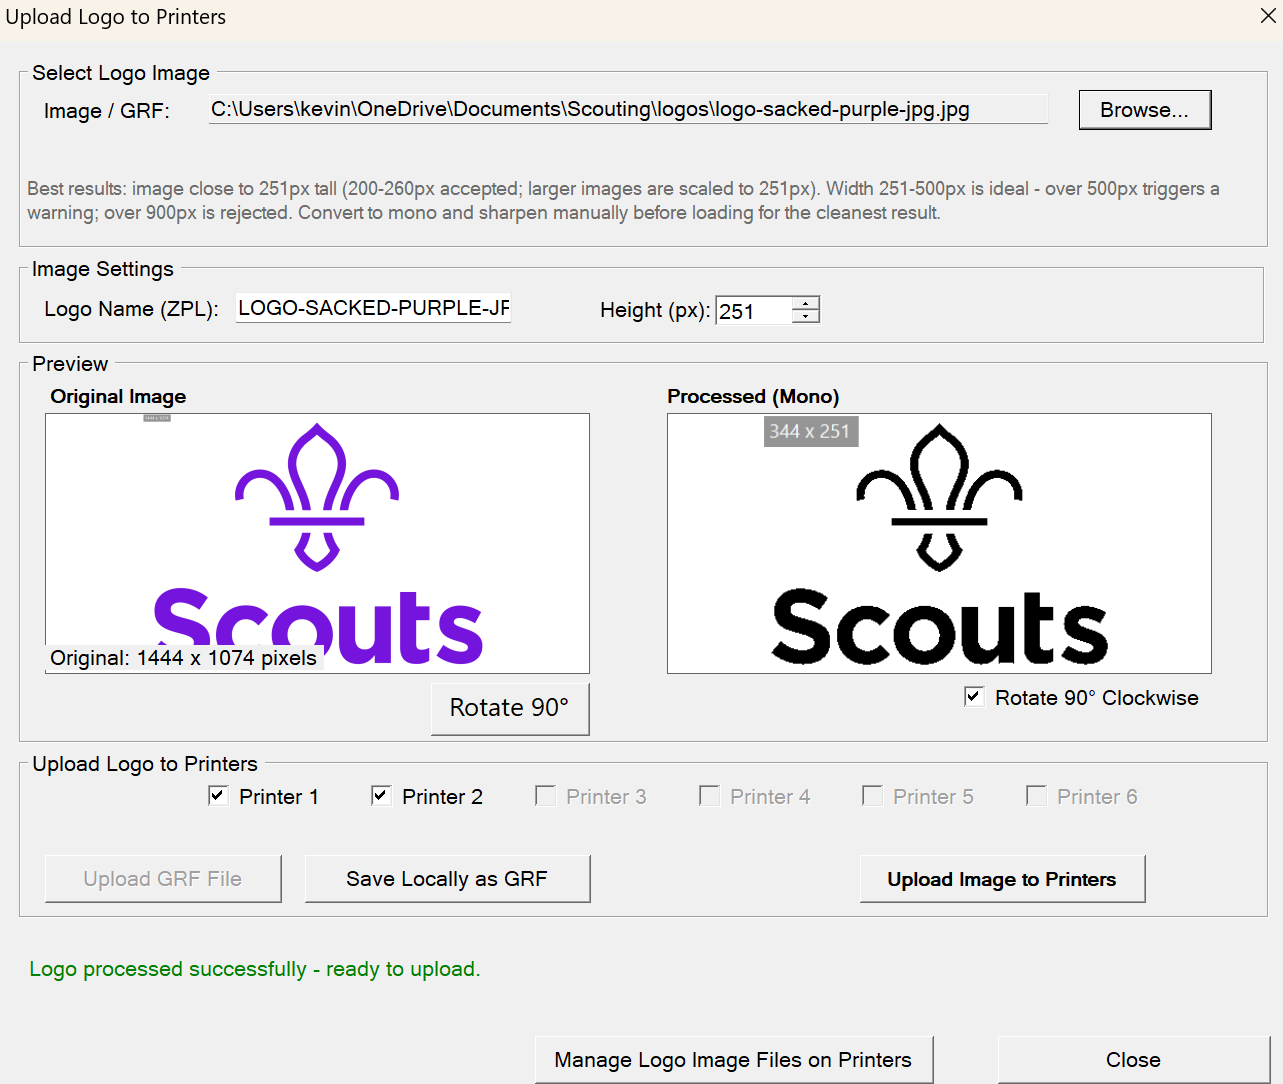
Saving a local copy:
Click Save GRF to save the processed logo as a GRF file on your computer. This is useful as a backup or if you need to share the logo file with another printer setup.
Part 2 – Printing Wristbands
Once configuration is complete, the app is ready for day-to-day printing.
Understanding the Main Screen
The main screen has three key areas:
| Area | Description |
|---|---|
| Search bar (top) | Type here to search for a participant, group, or team |
| Search Scope (radio buttons) | Switch between viewing Individuals, Groups (Scout Groups / Guide Units), or Teams (Registration Teams when in use) |
| Results grid (centre) | Shows the participants or groups matching your search |
| Print and Check-In buttons (top) | Print wristbands or check in the selected participants |
| Status bar (bottom) | Shows the name of the currently loaded event and the status of each configured printer |
Row colours in the results grid:
| Row colour | Meaning |
|---|---|
| Fuchsia / Pink | Wristband has not yet been printed for this participant |
| Red | Participant has not been validated in EvBoo |
| Normal | Wristband has been printed |
Searching for Participants
Use the search box at the top of the screen to find participants quickly.
Searching by name:
- Ensure Individuals is selected in the view selector
- Type the participant’s first name, surname, or part of either. Note do not search for both first name and surnamce.
- Click Search or press Enter
- Matching participants are displayed in the grid
Searching by group (Scout Group / Guide Unit):
- Ensure Individuals is selected
- Type the group name
- If no individual results are found but groups match, the app automatically switches to the Groups view
- Double-click a group row to drill down and view all participants in that group
Searching by registration team (Team – when in use):
- Select Teams in the view selector
- Type the team name
- Double-click a team row to view the individual members
Tip: If you type a surname and the result shows a group, it means no individual participant with that name was found but a group name matched. Check the spelling or try the first name instead.
Tip: Participants with a red background have not been validated – their details may be incomplete. You can still print their wristband but check with the EvBoo admin team if unsure.
Selecting Participants to Print
Once the results grid shows the participants you want to print for:
- Click a row to select a single participant
- Hold Ctrl and click to select multiple individual participants
- Hold Shift and click to select a range of rows
Note: Printing is only enabled when individual participants are shown (not when Groups or Teams are displayed at the list level). Double-click a group or team to drill into its participants first.
Printing the Wristbands
- Select one or more participants as described above
- Click the Print button
- The app checks the wristband colour assigned to each participant:
- If all selected participants have a valid colour and a matching printer is configured, printing begins immediately
- If a participant has no colour assigned, you will see a message asking you to complete colour allocation first
- If a colour is assigned but no printer is configured for that colour, you will be prompted to check the printer colour setup
- The status bar shows Preparing to print and then updates as each wristband is sent to the printer
- On completion, the status bar shows Printing Wristbands Finished
Tip: If you are printing for a large group, search for the group name, double-click to open the group’s participants, then use Ctrl+A to select all and click Print.
Note: If participants span multiple wristband colours, the app automatically sends each participant’s wristband to the correct printer. You do not need to sort or group them manually.
Checking In Participants
The Check In button marks selected participants as having arrived at the event. This can be done at the same time as printing or independently.
- Select the participants in the grid
- Click Check In
- The participants are marked as checked in within EvBoo
Printer Status Bar
The status bar at the bottom of the Printer App window shows a printer icon and status for each configured printer. The app checks printer status automatically when it starts and each time you save printer settings.
| Status shown | Meaning |
|---|---|
| 🖶1 : Blue | Printer 1 is online and has a Blue cartridge loaded |
| 🖶1 : Not Found | Printer 1 cannot be reached – check it is powered on and connected |
| (not shown) | Printer is disabled or not configured |
Tip: If a printer shows Not Found, check that it is powered on, the network cable is connected, and the IP address in Printer Setup is correct. You can also try running the Subnet Scan again.
Test Printing
To check a printer is working correctly without printing a real participant’s wristband:
- Open the Settings (or Printers) menu
- Click Test Print and then select the printer number (e.g. Printer 1, Printer 2)
- The app sends a sample wristband for a fictional participant (Bart Simpson) to that printer
This is a quick way to verify that a printer is online and producing correctly formatted wristbands after setup or after changing a cartridge.
Verify your wristbands before printing in bulk
Before printing large batches of wristbands we strongly recommend that you thoroughly check the bands to ensure they are as you are expecting. Print a small number and review the follow (as a minimum):
- The barcode has printed without issue and there is 6 digit number above it.
- The participants name is seen.
- The event logo is visible.
- The participant type is shown and the large letter as was expected.
- Activity Consents are showing and align to the consent received.
- The section / description of the participant is shown as expected.
- Any other details are shown – discuss your requirements with EvBoo in advance.
If there are any issues please contact EvBoo Support.
Printer Hardware Guides
###Wristband Printer Setup Follow this video for instructions on setting up your printers. https://www.youtube.com/watch?v=dELhkGHq5WU Note : You do not need to install any printer drivers for the wristband printers to work. These are only needed if you need to do any advanced configuration. In those cases we’ll tell you want to install. The EvBoo printer app only supports network printing. Printing via USB is not supported.
Manually obtaining the Printer IP Address
The tutorial above describes installing a cartridge and performing a test print. The test print includes the details of the IP address. By default our printers will get an IP address allocated by the network. This is the address you’ll need to add to the app.
###Understanding the Wristband Cartridges / Media The tutorial video below describes how to identify a full or empty cartridge, how to check if there is an issue with a cartridge and also how to cut off any media that is sticking out. https://www.youtube.com/watch?v=9wEAGyVEpEc
> NEVER PULL MEDIA FROM THE CARTRIDGE.
Troubleshooting
Printer shows “Not Found” in the status bar
- Check the printer is powered on (the power LED should be lit)
- Check the network cable is firmly connected to both the printer and the network switch
- Check that the printer’s IP address in Printer IP Address Setup matches the address displayed on the printer’s front panel or configuration page
- Try running the Scan Network function again – the printer may have been assigned a different IP address by your network
Wristband colour is blank / not set
- A participant’s wristband colour is determined by their event role. If the colour shows as blank, the event role has not been allocated a colour yet
- Return to the EvBoo website and complete Step 1 – Allocate Wristband Colours to Event Roles
Wristband is printing on the wrong printer
- Check that the correct colour is assigned to the correct printer in Printer Colour Setup
- If you have recently changed a cartridge, update the printer colour assignment to reflect the new colour
Logo is not appearing on wristbands
- Ensure the logo has been successfully uploaded to the printer(s) using the Upload Logo feature
- Check that the logo filename has been saved in the event configuration using your event booking system.
- If the logo file has been deleted from the printer, repeat the upload
The app says “No results found in database”
- Check your search term for typos
- Try searching with fewer characters (e.g. just the first three letters of a surname)
- Check the event loaded in the app is correct (shown in the status bar)